How to make 3D AI Cup Configurator on Three.js and React.js [Part 1]


12 min read
Final app that we’re going to develop: cup-configurator.vercel.app
Introduction
This series of articles assumes a basic knowledge of Git, React.js, Three.js and Typescript. And it will deal with the topic of 3D AI configurators on React.js, Next.js and Three.js. We will write a feature-rich app on Typescript with a small caveat that instead of the typical architecture for Three.js applications, we will build our AI configurator using the component-based approach offered by the React library and apply a React renderer for Three.js. In this way, we will simulate a development environment as close to the real world as possible, while simplifying the development of the application by taking advantage of packages such as Typescript, react-three-fiber and Next.js version 14.1.0.
Advantages of 3D web configurators
But before we dive in to the development of a 3D AI cup configurator, it is useful to understand what a 3D configurator is and what their advantages are using the example of an online store.
Let’s imagine that a coffee lover wants to buy a suitable cup for his collection in an online store. Upon opening the online store page with the product, instead of viewing static images, he is immersed in the 3D world of cups, where he can rotate, zoom and customize different attributes of the cup, including color, text and images. Do you think a user would be more likely to make a purchase in such a store? Rhetorical question.
Clearly, 3D configurators benefit both customers and businesses by improving the user experience, giving customers interactive ways to explore products, allowing them to customize their merchandise and increasing the likelihood of purchase, while strengthening brand relationships, not to mention increasing key business metrics such as conversion and others.
Another great advantage of web configurators is their unprecedented accessibility, allowing anyone with a mobile phone, tablet or even a cheap computer connected to the internet to work with them. This accessibility simplifies the immersion process, removing barriers to entry and making it possible to deliver key product values to users from different socio-economic backgrounds.
In addition, the compatibility of these configurators with mobile devices enhances usability, allowing users to have an immersive experience on the go. Whether at home, on the road or on a break from work, customers can easily access key features of 3D configurators from their portable devices without downloading any special software, which is certainly very convenient. Unlike traditional software solutions or complex design programs, which often require specialised hardware or significant financial investment, 3D web-based configurators are an order of magnitude cheaper to develop and also work effectively on widely available devices that have an internet connection and an installed browser, eliminating the need for high-tech hardware or expensive PC installations.
Core web technologies for creating a 3D AI Cup Configurator
Creating an fully functional 3D AI cup configurator will require two powerful libraries - React.js, which will be used in the context of Next.js and of course Three.js and its renderer for React applications. You will also need the Fabric.js package for advanced 2D-canvas management. The other dependencies are secondary and can easily be replaced if desired, but this is not recommended.
The main functionality that will be implemented in the application is:
- Interactive representation of a GLB cup model on a Canvas3D
- Interactive representation of the cup print on Canvas2D, with real-time rendering of the result on the cup model in Canvas3D
- Actions panel for advanced Canvas2D management, including downloading the finished print in PNG format
- A Settings panel for Canvas2D that adds the ability for the user to:
- Add text to the print and customize it
- Upload their own images and use ready-made ones
- Use predefined patterns as a background
- Use predefined images as background
- Add SVG images as geometric primitives
- Create AI images using a third-party service
- Switch dark/light themes
Basic technologies for developing functionality:
- React.js in the context of Next.js, including App Router, Layouts, RCC, RSC, Serverless Functions
- Typescript
- Three.js and react-three-fiber
- Fabric.js
- Zustand as client state manager
- Responsive and beautiful Radix + TailwindCSS components, for a modern UI
- Browser API for uploading and downloading images
- Conditionally free API of Eden AI service as artificial intelligence provider for image generation.
It may seem difficult to master all these technologies at once, but don’t worry, I will explain in detail the basic steps of creating an advanced 3D AI cup configurator in React.js, Next.js and Three.js. If you follow my instructions, creating a 3D AI cup customizer won’t be too difficult. If there are still difficulties, you can always switch to the main project branch and further explore the source code of the finished application and understand what works and how it works.
Step-by-step plan for developing a 3D AI Cup Configurator
I propose to familiarize ourselves with the algorithm, which consists of 5 basic steps, following which we will create our 3D AI cup configurator on React.js, Next.js and Three.js:
- Cloning a remote repository and installing dependencies of a prebuilt template from the starter branch.
- Adding a default background image and the required logic to Canvas2D to display a custom print and implementing a panel with additional functionality for Canvas2D:
- Clearing the background
- Removing Fabric.js objects such as text or images
- Controlling the order in which layers are overlaid
- Downloading the final print in PNG format
- Adding logic to the 3D Canvas to display a GLB model of the cup and a custom print on it based on information from the 2D Canvas
- Implementing functionality to personalize a 3D cup. Adding logic to the Settings Panel component and thereby enabling the user to:
- Adding text to the print and customize it
- Uploading own images and use predefined ones
- Using patterns as backgrounds
- Using images as backgrounds
- Adding SVG images on the canvas
- Generating images using Eden AI API
- Publishing source code on Github, setting up previews and automatic deploys to Vercel
Beginning of implementation
While writing this article I will be using Visual Studio Code and will assume that your IDE and working environment is already set up and ready for the first step.
To focus on developing the core functionality I have prepared a starter project template which can be found in the starter branch in the github project repository .
The starter template already includes: basic configurations for tailwind, next, typescript, prettier and eslint, which you can extend as you wish. Also included preloaded fonts, default background image for Canvas2D component, GLB cup model, Draco loader for optimized loading of GLB files, basic application page layout including header with theme switcher, scene rendered with Canvas3D component, where the environment is minimally configured, in which the GLB cup model will be rendered later, Canvas2D component and a ready-made Settings panel component, which elements can be switched using the corresponding navigation buttons, but which lacks key logic.
Next, I suggest that you add the necessary logic responsible for the key functionality of the application to the components step by step on your own and, in case you fail, return to the code snippets in this article or to the final code in the main branch of the project repository.
Now, clone the repository to the selected directory on your computer and switch to the starter branch of the project tree by entering the following commands in the terminal of your IDE:
text
Next, install the project dependencies and start the local server for development by entering next commands:
text
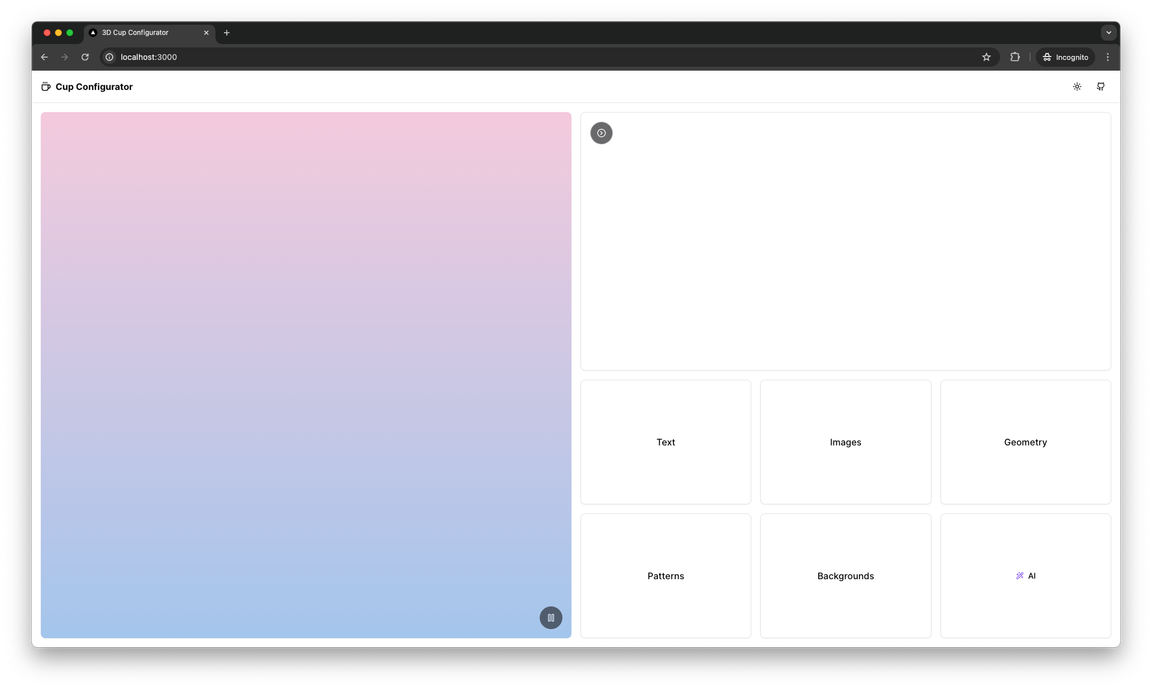
If errors have already occurred at this stage, fix them and return. On the local server, the browser should show the following:
I propose to start with the description of the type of data store, and then move on to its implementation. Here is how I see the store:
lib/store.tsts
This is not necessary, but for convenience I suggest putting our store in the /lib directory. And make /lib/store.ts look like this:
lib/store.tsts
And types FabricCanvas and PartialTextSettings from @/types:
lib/types.tsts
Then, following the plan, we create the useInitFabricCanvas hook to initialize fabric canvas in the /lib/hooks.ts directory and the useFabricCanvas hook in same directory:
lib/hooks.tsts
Then the component /components/Configurator/Canvas2D/index.ts in which we will call these hooks to initialize Canvas2D and install the prepared image will look like this:
../Canvas2D/index.tstsx
This is what we should have in the browser in the current step:
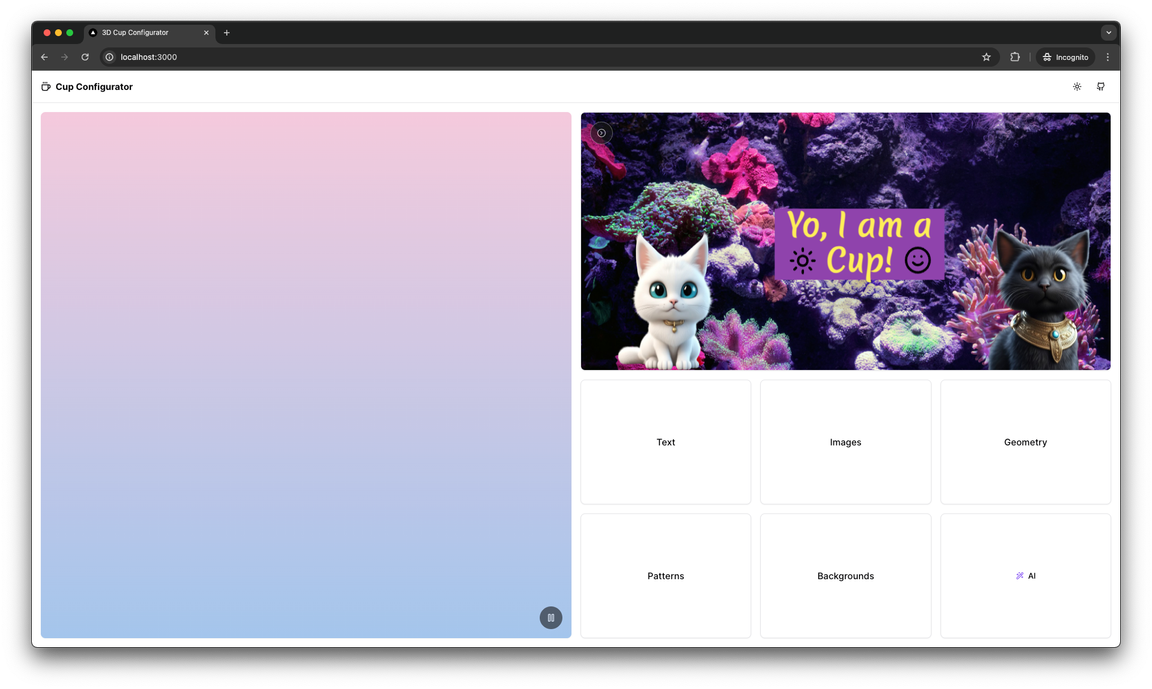
It looks great! It’s time for a brief summary of what’s been done.
Summary
In this article, we started the process of creating a 3D AI cup configurator using Three.js, Fabric.js, React.js, Next.js and Zustand - the core technologies. We installed the project dependencies, ran it in a browser and did basic configuration. Also implemented a store to manage the application state, wrote some functions to initialise the fabric canvas in the Canvas2D component and render the default background image. In the next article, you will continue to develop the application by following the steps described in the plan in this article and even extend its functionality to better understand 3D AI web customiser development.